Using Tax Form Templates
When you export tax data from 1099-Prep, a tax form template file is downloaded to your computer. This file is a specially formatted spreadsheet that serves as a container for tax data.
The name of the spreadsheet file that downloads is formatted as:
[customer account]_[export type]_[report Id]
-
[customer account]: The name of the customer account associated with the export.
-
[export type]: The name of the type of export performed. Text can be: "Export", "ExportPriorYearRollover", or "ExportTemplate".
-
[report Id]: A report ID number that can be found in the Report History panel.
New tax data can be entered cells of the spreadsheet or you can edit tax already in cells, if you exported tax data from a select year or prior year.
To update the tax form template, open the spreadsheet file and enter tax data in cells of the spreadsheet, in the proper format.
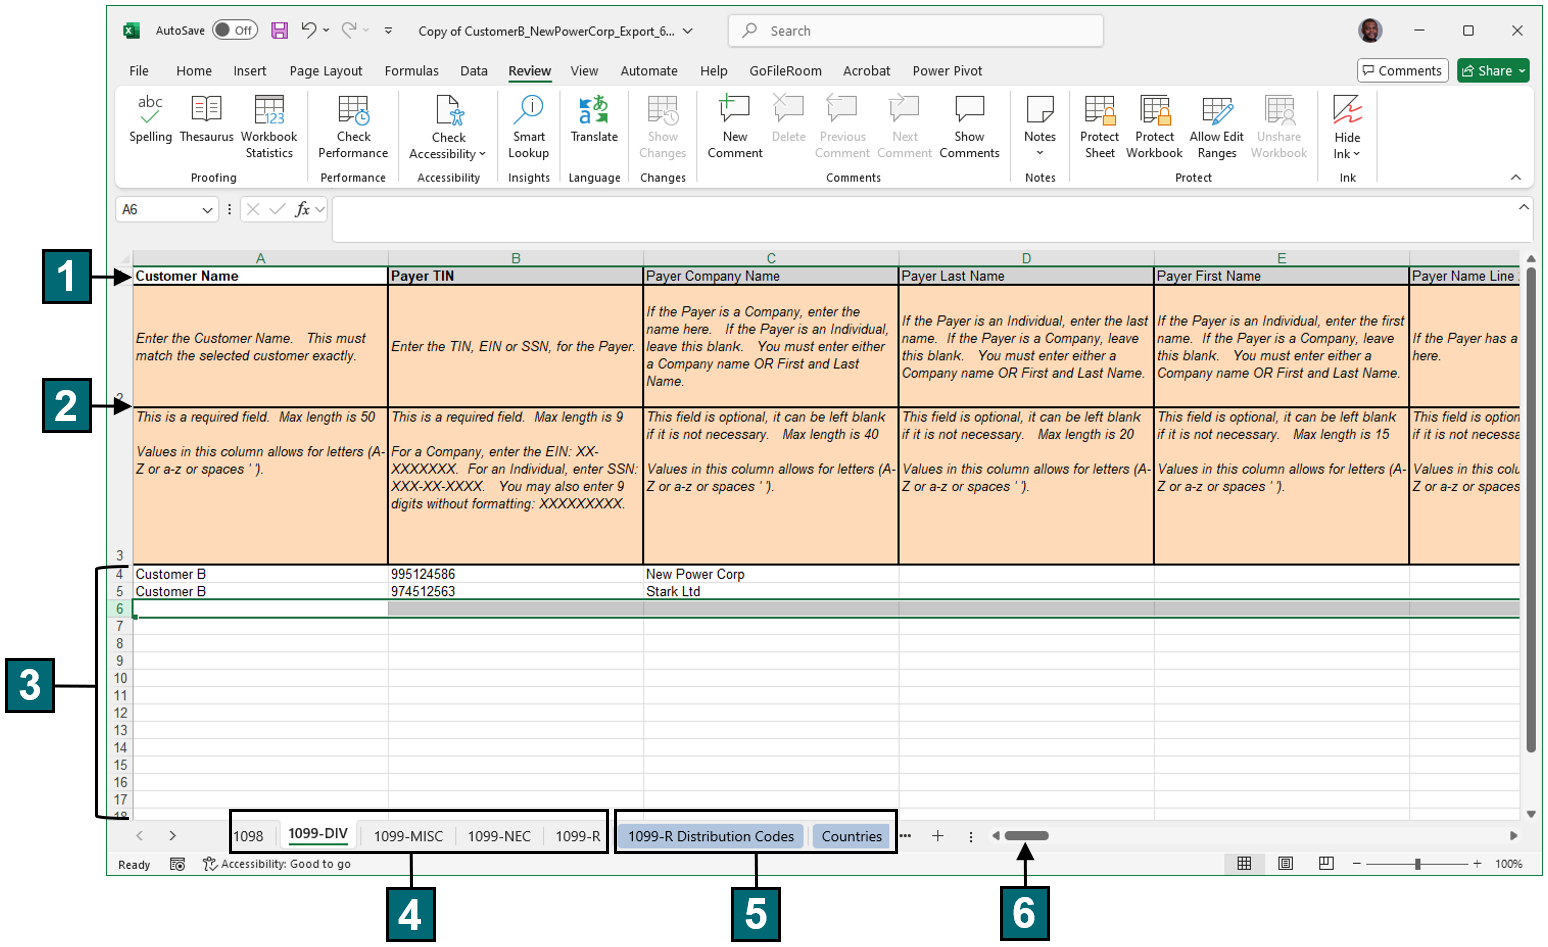
Use the image and table below to learn about properties of the spreadsheet file and how to correctly .
After you are done adding tax data to the spreadsheet, save it and use the Import feature to import tax data into 1099-Prep.
IMPORTANT: If tax data is not entered in the spreadsheet in the correct format, the import will fail and the file will need to be corrected (see Resolving Import Failures).
Click a number in the image to navigate to a description of that feature in the table below.
|
Feature Name |
Definition |
|
|---|---|---|
| 1 | Field Names |
The first row of the spreadsheet always contains the "Customer Name", followed by payer, recipient, and tax form field names. These are the same field names that display in the Payer, Recipient, and Tax Form add/edit prompts of 1099-Prep. Tax form field names change, based on the type of tax form. Additionally, cells of field names are color-coded so they can be easily identified:
Use the horizontal scroll bar to see other field names in the spreadsheet. |
| 2 | Field Formatting | The 2nd and 3rd rows in the spreadsheet always contain information on how data should be formatted for field entries. Make sure data you enter in subsequent rows match formatting information to avoid import failures. |
| 3 | Data Entry Rows |
The 4th row in the spreadsheet and all rows that follow are used to enter data that relates to the payer, recipient, and tax form. Each row is considered an single payer, recipient, and tax form. When the spreadsheet is imported, data in cells of the row is converted into the payer, recipient, and appropriate tax form in the customer dashboard. Each cell in a row is a specific field in the payer, recipient, and tax form. |
| 4 | Form Types |
If you exported more than one form type, each individual form type displays as worksheet tabs. When entering tax data in Data Entry Rows, ensure you select the correct form type for the tax data. When the tax form template is imported into 1099-Prep, each form type is converted into the appropriate tax form and listed under the related payer and recipient. |
| 5 | Field Codes (Options Lists) |
Depending on the form type you exported, additional worksheet tabs may display, in blue, next to form type tabs. These tabs contain a list of code options for specifc fields(i.e., cells in the spreadsheet). When a field/cell in a data entry row requires a code, reference these sheets for the appropriate code. NOTE: The Field Formatting rows in the spreadsheet will indicate if a cell needs a code from the "Options List". |
| 6 | Horizontal Scroll Bar | Use this scroll bar to ensure you see all fields in the spreadsheet. |
